Tuesday, December 21, 2010

thanks for the memories...

Thank you to everyone who stopped by my annual Creative Memories Open House/Customer Appreciation Event!  Over $2,000 of albums and supplies were sold and my shelves are empty! After 16 years in this business I am thankful for all of you who support my business and who visit my website.

For those of you who weren't able to stop by in person, I wanted to share with you a few of the highlights. Of course, there were cookies...but there was also Albums on Parade:

In years past I have had my customers bring their albums for display. But this year, I put out all of my Creative Memories Career albums for a special celebration of the past 16 years! Nine career albums completed!  And probably enough recent pictures and memorabilia to do about three more!

When I first started my Creative Memories business in 1994, I was living in a little 500-square-foot apartment. I kept my inventory in two cardboard boxes in my closet. I only had room for 2 scrapbookers at a time so I thought it would be easy to fill up my workshops! I scheduled workshops all summer long and no-one came. I never cancelled though and instead I worked on my own albums. Then I would send out newsletters saying, "It was so exciting at last month's workshop, 26 pages were completed!"  No-one knew it was only my 26 pages! Eventually people started coming to find out who was getting so many pages done. That was the beginning of a very exciting, challenging, and rewarding career.

Soon I had a team of Consultants joining me in this business and I was promoted to Unit Leader. My husband and I bought a condo and had a little more room. I started holding monthly meetings for my team. My workshops were growing and we started having at-large events at local colleges and athletic clubs. My meetings were soon filled-to-capacity and people were sitting on our stairs just to fit. We had to move our meetings to a local hotel ballroom.  It was a highlight when doing what I loved (scrapbooking, writing, taking photos) turned into a rewarding career. The company sent me on several all-expense-paid Incentive Trips as well as on-stage recognition and exclusive Leadership events.


In 2001 I reached my dream of promoting to Director. I had a team of leaders and over 200 Consultants on my team with over a million dollars in sales! I was living the American Dream. A highlight that year was picking up all of my leaders in a stretch limousine and taking them to our annual Christmas Tea in a limo - all paid for by 'my little home business.'

The biggest highlight though is personal growth and the friends I have made along the way. I was so shy when I first started this business! Oh my. I couldn't even stand in front of a small group of people so I would sit alongside them and teach how to scrapbook. Never would I have imagined that years later I would speak at National Convention in front of 4,000 women and feel completely comfortable and excited doing it!  My customers and my team are some of the most amazing women you will ever meet. Many of my team members have gone on to other direct sales companies and have reached the highest levels of leadership through what they learned with Creative Memories. I have stacks of cards and letters from customers and clients who have shared what an impact their scrapbooks have made on their family and their relationships. 

I have enjoyed the flexibility of owning my own business. Thanks to you, I was able to add four babies to our family while still ordering $1,000+ per month during my four 'maternity leaves'. Thanks to you I was also able to maintain my business while my husband was deployed with the military for 9 months. Thanks to you, I have had an amazing career with Creative Memories. We still have the very best scrapbook albums and refill pages, made in the U.S.A. We still have an important mission: preserving the past, enriching the present, and inspiring hope for the future.

I hope you have a very Merry Christmas and a Happy New Year!!

Thanks for the Memories...

Tuesday, December 7, 2010

December Daily update

I've been having so much fun with our December Daily album! It sits on our kitchen counter and the basket of supplies is within easy reach for a quick update. Yesterday I enjoyed lunch with my very creative and talented friend Jennifer C.  Jennifer showed me her December Daily album and I was so inspired I came home and gave mine a makeover!  Just added a strip of paper on the top of my title page, then a strip of silver ribbon really jazzed it up! I wish the photo could show you all the glitter. I'm a big fan of glittery paper!


This weekend our family enjoyed a Holiday Concert by a local community band. When we got home I cut up the program and added bits to our December Daily album.  This seriously takes about 5 minutes...anyone can do this! I will use the journal box to write about the concert...we learned that Sleigh Ride was written by Leroy Anderson in 1948 and it consistently ranks among the top 10 most performed songs during the Christmas season. It happens to be one of my all-time favorites.

This weekend was also Family Day for the Navy and I enjoyed spending the day with My Hero learning about how to make our military family unit stronger. I glued a bright red felt ribbon down the side and used pre-lined paper to decorate this page. I'll be journaling the highlights of the day as well as my thoughts on being a military wife. I'm so thankful My Hero is home for Christmas this year as I know so many who are serving overseas. We are grateful.

Have you started a December Daily??  Wanna share your thoughts? Post a comment or link to your blog! Would love to see how you are recording this most busy time of year!

Friday, December 3, 2010

December Daily 2010


Some of you may remember my December Daily album from last year.
It's a small album you leave out on your kitchen counter - each page is numbered and you add photos, journal thoughts, add ticket stubs, etc... all throughout the December holiday season.
I just put our 2009 December Daily album out the other day - it's a treasure...I'll share some of my favorite pages soon.

For now, it's time to prepare and fill up December Daily 2010!  I spent some time this week putting it together:

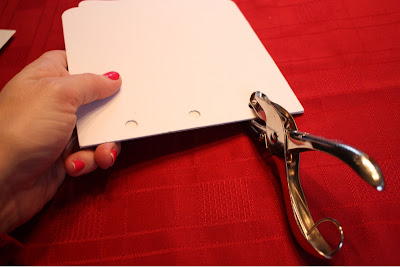
Trim card stock any size (I chose 6.25" x 6.25")


You can use other materials too like chip board or acrylic. I used chip board as my pattern and then used a hole puncher on my card stock:


the acrylic sheets are something new I am trying this year. you can find them precut and punched for convenience. I used an acrylic sheet for my cover - title stickers show up nicely on them:


Some people just make pages for December 1-25....but last year I included the entire month and I also added some extra pages in the back for miscellaneous photos and notes (like the kids wish lists).  After you put all your pages together, use rings to secure, then for a finished look I tied the rings with some festive ribbon:


Next I fill a basket with supplies we can use to complete the album:

the basket includes:
journaling boxes/prompts
pen
tape runner (adhesive)
holiday paper scraps
title stickers
123 stickers (for labeling the date)

Have fun!!  Enjoy!!  Happy Scrappin',
:DL

Wednesday, November 24, 2010

Black Friday $1.99 Shipping!!

Check out these fabulous deals that start on Black Friday, November 26 (12am CST) through Monday, December 6 (11:50pm CST):

- Online orders ship for just $1.99! Place a minimum order of $25 on my personal website and pay just $1.99 for standard shipping!! Enjoy the convenience of having your order sent directly to your home!

- Fill your cart and get rewarded! Spend $225 online and get 5 free products, $93 value! Includes an exclusive 12x12 Winter Album!


- Photo Panels make fabulous gifts and they are 20% off through Monday, Dec. 6th! Many more digital photo gifts to choose from (mugs, wall prints, mouse pads, t-shirts and photo panels all 20% off!

- Storybooks ship for just $1.99!  Order photo books for all your friends and family from the Creative Memories digital center. Each book ships for just $1.99!

- Facebook deals - visit us on Facebook and discover special deals. Hurry all offers are while supplies last!

Thank you for your business and have a wonderful, memory-making Thanksgiving!!

Grateful for you,

:DL

REMEMBER THE $1.99 SHIPPING DEAL IS NOV 26-DEC 6 ONLY!!

Wednesday, November 10, 2010

scrapbooking school albums

This week's project was getting Jelly's School Album caught up. And I did! It feels so good!
Everytime I felt myself getting overwhelmed, I just kept telling myself that 'a few photos and a few words for each year is sufficient.'  It's more than most kids get and it will be meaningful to her.

I start with a border down the side of the page (these pages happen to come pre-decorated, saving me this step).  Then I add a Title (i.e. "Seventh Grade") and a journal box:

In the journal box I write:
School year _______
My School _________
My teachers ___________
My friends _____________
I enjoy ____________________ 

I add a photo from the first day of school and the last day of school.
I add a 5x7 school portrait and misc. photos throughout the school year.

Each year gets about 4-6 pages. I include clear pocket pages for brochures and memorabilia or artwork.  I keep a file folder handy for each child and during the school year will toss things into their file that I want to include in their School Album.  I'm really excited to be caught up on this because it's much easier to keep up on these once/year than it is to go back over several years (or decades).

Next project: Blondie's school album...I'm the furthest behind on hers but I am determined to get hers caught up this year. What are you up to??

Happy Scrappin',
:DL

Wednesday, November 3, 2010

simple collage pages

Many idea books feature 1 or 2 photos per page. I just can't scrap that way...at least not affordably and not quickly. Once in awhile it makes a cute title page or special page but typically I try to get as many photos on the page as possible. 

Collage Pages come in handy when you have a ton of photos for one event. This is how I scrapped our summer building project:

 I was able to include a journaling box so I can journal the 'story' behind the photos.

Collage pages also work well for that collection of miscellaneous photos you have - not from one particular event but just a random photo here and there. I used several random summer photos to capture the 'good things' of summer 2010:

"good things" page includes wading pool, backyard dinners, blueberry picking and homemade blueberry muffins.  I'll add strips of journaling paper later.  (but not too much later or I'll forget!)

Here is a page I did for the Prince's first day of Kindergarten. Again, it's something we took a lot of photos of and I wanted to include them all but keep it to one page. I've left room for journaling on the bottom right corner.

You may be wondering why I don't just do the journaling when I complete a page. The reason is because I was at a scrapbooking retreat. I tend to start journaling the conversations around me instead of what the photos are about! So I just leave the journaling for quiet time later at home.

As you can tell I LOVE my straight trimmers!  They are about all I use. I cut my photos with the Personal Trimmer and I cut my 12 inch strips of paper with my Rotary Trimmer. Quick!
And for the first time ever the little Personal Trimmer is now available in Purple!

Wednesday, October 27, 2010

Simple Scrapbooking

 Step 8 Just Scrap It!

You've decluttered, picked an album project, selected and printed photos, gathered supplies, now it's time to get scrappin'!


My best advice for any of you overwhelmed is to

KEEP  IT  SIMPLE.
really.

For our 2010 Family Album I chose Spargo pages (a light natural shade). The neutral background sets off photos nicely without the starkness of a white page. Notice in the above page spread, I've only used my Trimmer and 2 pieces of paper to mat a couple of the  photos in a coordinating shade. I've left room for journaling and I've added a quote sticker:

I love this page!!  It's one of my favorites and it took just a few minutes to trim and mount my photos. If every page looked like this, it would be a classic album enjoyed for generations.

Here is another Simple Page where I've kept my photos square and added a strip of 1.5"x12" paper down the left side of the page.  I added a little quote sticker in the middle and left room for journaling (to be added later).

Anyone can do this.
Anyone.
really.

So no more excuses....it's time to Get Scrappin'!
:DL


Thursday, October 21, 2010

How to Organize your Scrapbooking Supplies

Step 7 Gather Your Supplies...this is the fun part!

I'm going on a retreat in a couple of weeks and this is what I'm bringing:

Scrapbook Album and Pages...I'm using 12x12 for our 2010 Family Album
12 inch Trimmer and Personal Trimmer
my small Personal Trimmer has a handy drawer where I store:
Scissors
Blades for my 12-inch Trimmer
Tape Runner Adhesive
Black Fine-tip Pen


Decorative Supplies...
I use my handy Paper Organizer to hold my paper and ABC stickers sorted
by color or theme as well as my "Additions."


Additions are themed packs of patterned paper, stickers, and Title stickers.
 I've selected a variety to cover photos of 2010 (Winter,
Spring, Summer,4th of July, Fall, Disney, School, Tea Party, etc.)


I also bring colored pens and ABC stickers for journaling and titling:


That should do it!  

If I want to get extra creative I may also bring:

Cutting System (cuts my pictures into ovals, circles and other shapes)
Shape Makers - basically punches that punch my paper into decorative shapes
Paper Flowers and Ribbon

I will also pack:
Photos in my Photo Storage Box
Memorabilia File
Extra Page Refills and Extra Adhesive Refills
Party Bag of Pretzel M&M's 

Something new that I'm going to try:
Page Planners....a set of plastic page templates and Idea Book
to help me layout fast cute pages!  I'll let you know how that works...stay tuned.

What about you? How are you doing on Getting Back Into Scrapbooking?
Have these ideas helped?  If you don't have a retreat getaway planned in the next month or so, then schedule in some time in your calendar for a morning or evening of scrapbooking. See if you can get started on that next album you are dreaming of completing. I would love to know what it is and how you're doing!! 

Happy Scrappin',
:DL

Tuesday, October 19, 2010

How to Sort your Photos

Step 6: Sort Your Photos. A big fat envelope arrived in the mail last week with all my wonderful photos developed online by CM Photo Center  I also picked up photos from Walgreen's and again, I was disappointed in the color quality. In a future post I'll do a comparison of photo developers so you can see for yourself that developing matters!

When you receive your photos they are all jumbled together in no particular order. So it's necessary to sort them and the best way I have found is using a Power Sort Box.
Using your events list (from Step 4) you can easily sort your photos into piles by date.

Then I store them in this handy box:
The box has 6 individual compartments inside so you can easily pull out a batch of photos at a time while scrapbooking. For my project I've sorted them chronologically Jan-Oct 2010. Notice the box holds both 4x6 and 5x7 photos.

There is even a memorabilia pocket under the top lid.  You'll want to also have a file folder for larger memorabilia. Label the folder with the name of your album project (i.e., "Family 2010" or "Susi: School")

The lid stays securely on with loops on the side. Label the front of the box for easy identification.


It has a stylish look and you can stack these for easy retrieval.  This box holds 1,200 photos. Since I am using it for my current album project, I only needed about 2 of the inside compartments. The other compartments I used to store 4x7 photo mounting paper and extra boxes of adhesive to take with me when I go scrapbook.

Next Step 7 will be Gather Your Supplies!

Friday, October 8, 2010

How to print your photos from your computer

Step 5: Print Your Photos
wow...I've been busy uploading my photos to be developed!  It's fairly easy with my Memory Manager program, because I just highlight the photos that I want to print then either send them to my printer or upload them to an online developer.  

I usually just upload my photos to Walgreen's and pick them up same day. However, I haven't been very happy with the print quality lately. My pictures look dark and the color is off. 

What I do is create a folder on my desktop called "Upload"

I drag and drop the photos that I want printed into my Upload folder. Then I go to a developer's website (Walgreen's for instance) and sign in. I select "Upload photos" and when it asked where the photos are you just browse and find your "Upload" folder. 

 You pick which photos to upload or you click "shift-A" to select them all and then click Upload. Walgreen's website has quick upload. But again, if the quality isn't good, then it won't be worth the quick upload. I'll be sure to do a comparison when they come in from both sources and I'll share them with you here!


I'm really excited because just a couple of weeks ago I was overwhelmed and stuck but today I've got 9 months of pictures being printed and shipped to me as I type this.

Next step will be Sort Your Photos!

Tuesday, October 5, 2010

Help! I have too many pictures!


Step 3 was Pick your Project! How did you do? I decided my next project will be our 2010 Family Album.

Step 4 is Decide what Pictures to Print.

In today's age of digital cameras, we take thousands more photos than we will ever need to print. That's the beauty of digital but it also can create panic when you go to choosing and printing your photos.  Because some of us still have our photos hidden on our camera......right? your digital pictures are still on your camera? or did your memory card fill up and you just tossed it somewhere and bought a new memory card?

I have found that Creative Memories Memory Manager program (now Artisan) is a user-friendly way to get photos off my camera and into virtual 'sort boxes'. This is where I store my digital pictures:

the column on the left (above) shows my "virtual sort boxes."

I can choose whatever categories I want to sort my photos:

 
You can see (above) that I have a sort box called Family. This is where I will find all of my photos needed to create a family album. Once I click on "Family", I can go to the timeline displayed at the bottom of my screen and choose "2010"...I can view all my 2010 photos in that 'box' or I can view them by month or even down to daily:

Here (above) I've sorted them by month.  When I click on April 2010, for instance, it will show me all the photos I've taken this past April.  Since I'm a 'simple scrapbooker' I will only be printing my favorite shots and just a few events per month (hey, I'm a busy mom of 4 kids, remember?).

So Step 4....I make a list of the events that I want to include in our Family 2010 scrapbook. This list will greatly help me when I'm 
choosing which photos to print
and
when I'm putting my album and supplies together

It would be easier to do a couple of page spreads each month rather than saving this and doing it all at once, but that's what happens when you put stuff in a pile 'to do later'...that pile grows and then you are in the position of catching up.  

Stay tuned for Step 5 when we are going to Print our Photos!

Happy Scrappin',
:DL